Film Scans: 18 Common Issues (+ How to Fix Them!)
Film photographers have all experienced anomalies with film scans.
It could be strange lines and dots blemishing your images, discolored patches, or even portions of the image mysteriously blacked out.
That's why, in this article we’ll provide you with a comprehensive breakdown of the causes behind 18 of the most common film developing and scanning issues, along with effective solutions.

Underexposed Film
Underexposed film occurs when light exposes the negative for too short a time to record a well-defined image in film scans.
As a result, your scans will appear dark, faded, grainy, and have very low contrast. In fact, the negative film itself may appear faint and almost see-through.
What are common issues with underexposed film?
Loss of shadow detail:Underexposure causes the darker areas of the image to lack detail, appearing as solid black or very dark patches. This can make it difficult to discern objects or elements in the shadows.
Reduced overall brightness: Since the film has not received enough light, the entire image may appear darker than intended. This can result in a lack of brightness and a general underexposed look.
Increased grain or noise: In an attempt to compensate for the lack of light, the film may be pushed during development, which can increase the grain or noise in the image. This can lead to a loss of overall image quality and fine details, similar to overexposed film.
Lack of contrast: Underexposure can result in a loss of contrast, making the image appear flat and lacking in depth. The tonal range between the darkest and lightest areas may be compressed, resulting in a less dynamic and visually appealing image.
Color shifts: Underexposed film can also cause color shifts, where the colors appear inaccurate or muted. The lack of light can affect color reproduction, resulting in a loss of saturation and vibrancy.
It's important to note that the impact of underexposure can vary depending on the type of film used and the specific characteristics of the camera or equipment.
How do I fix underexposed film?
Post-processing adjustments: If you have scanned the underexposed film to a digital format, you can use photo editing software to make adjustments. Increase the exposure and shadows to bring back some detail in the darker areas.
Adjusting the contrast, brightness, and saturation can also help improve the overall appearance of the image. Keep in mind that the extent to which you can recover details depends on the severity of the underexposure and the quality of the original image.
Dodging and burning: In a traditional darkroom setting, you can employ dodging and burning techniques to selectively lighten or darken areas of the image.
This can help balance the exposure and recover some lost detail. By using opaque objects or your hands to block or allow light during the enlarging process, you can manipulate the exposure locally.
Film development adjustments: If you are shooting with negative film and developing it yourself, you can try adjusting the development process. For example, increasing the development time or dilution can help compensate for the underexposure to some extent.
Additional lighting techniques: If you are shooting with film and have the opportunity to reshoot the scene, consider using additional lighting to properly expose the subject. This can help ensure proper exposure and reduce the chances of underexposure.

Overexposed Film
Overexposed film occurs when the negative is exposed to light for too long, resulting in dense and excessively brightfilm scans.
When you examine your scanned images, you will notice that the highlights appear dull and gray. This is because our scanners must reduce the overall lightness of the image in an attempt to preserve definition in the mid-tones.
As a result, the contrast between the darkest darks and the lightest lights will be high, but the dark, dense areas dominate the overall image.
To address the challenges posed by overexposed film, it's crucial to understand how to recognize this issue and explore effective methods of correction.
What are common issues with overexposed film?
Loss of detail: Overexposure can cause the bright areas of the image to become washed out, resulting in a loss of detail. The highlights may become completely white, lacking any texture or information.
Reduced contrast: Overexposed film tends to have reduced contrast because the excessive light can make the shadows appear brighter, reducing the distinction between different tones in the image. This can result in a flat and dull appearance.
Blown-out highlights: Overexposure often leads to blown-out highlights, where the brightest areas of the image become completely white with no detail or texture. This can result in an unnatural and distracting look, particularly in areas such as the sky or other light sources.
Color shifts: Overexposure can also cause color shifts in the image. The colors may appear washed out or inaccurate, with a loss of saturation and vibrancy. Skin tones, in particular, can look pale or unnatural.
Increased grain or noise:In an attempt to compensate for the excess light, the film may be pushed during development, which can increase the grain or noise in the image. This can lead to a loss of overall image quality and fine details.
How do I fix overexposed film?
Post-processing: If you have scanned the overexposed film to a digital format, you can use photo editing software to make adjustments. Reduce the exposure and highlights to bring back some detail in the bright areas.
Adjusting the contrast and saturation can also help improve the overall appearance of the image. Keep in mind that the extent to which you can recover details depends on the severity of the overexposure and the quality of the original image.
Dodging and burning: In a traditional darkroom setting, you can employ dodging and burning techniques to selectively lighten or darken areas of the image. This can help balance the exposure and recover some lost detail. By using opaque objects or your hands to block or allow light during the enlarging process, you can manipulate the exposure locally.
Graduated neutral density filters: When capturing the image, using graduated neutral density filters can help control the exposure by reducing the amount of light reaching specific areas of the frame. This can help prevent overexposure in bright areas, such as the sky, while maintaining proper exposure in the rest of the scene.
Film development adjustments: If you are shooting with negative film and developing it yourself, you can try adjusting the development process. For example, reducing the development time or dilution can help compensate for the overexposure to some extent. However, this is a complex process that requires knowledge and experimentation.

Camera Obstructions
What are common issues with camera obstructions?
Blocked or distorted view: When there is an obstruction in front of the camera lens, it can block or partially block the view of the subject. This can result in images with portions of the frame completely obscured or distorted, affecting the composition and visual representation.
Loss of focus and sharpness: Camera obstructions can interfere with the camera's autofocus or manual focus capabilities. The obstruction may prevent the camera from accurately focusing on the intended subject, leading to images that are out of focus or lack sharpness.
Lens flare and ghosting: Obstructions in front of the lens, such as bright lights or objects reflecting light, can cause lens flare or ghosting. This can result in unwanted artifacts, reduced contrast, and decreased image quality.
Shadows and vignetting: Some obstructions, such as the camera's lens hood or improperly attached filters, can cast shadows on the image or cause vignetting—darkened corners or edges. This can impact the overall exposure and uniformity of the image.
Image distortion and aberrations: Obstructions near the lens or sensor can introduce image distortion and aberrations. These can include effects like barrel distortion, pincushion distortion, or chromatic aberration, resulting in unnatural and undesirable image characteristics.
Sensor damage: In extreme cases, obstructions may physically contact or damage the camera's image sensor. This can lead to permanent defects or malfunctions in the sensor, impacting image quality and rendering the camera unusable until repaired.
To avoid camera obstructions, it is important to keep the lens and sensor area clean and free from any objects, fingerprints, or debris.
How do I fix camera obstructions?
Identify the obstruction: Carefully inspect the camera setup, lens, and any accessories for any physical obstructions. Look for objects, debris, or other elements that may be blocking the lens or interfering with the image sensor.
Remove the obstruction: If you identify a physical object obstructing the lens or sensor, gently remove it using appropriate tools or by hand. Be cautious not to damage any delicate components.
Clean the lens and sensor: If the obstruction is due to dirt, smudges, or fingerprints on the lens or sensor, clean them using appropriate cleaning tools and techniques.
Use a lens cleaning solution and a microfiber cloth for the lens, and follow manufacturer guidelines for sensor cleaning.
Adjust camera accessories: If the obstruction is caused by improperly attached accessories like lens hoods, filters, or lens caps, ensure they are properly mounted and aligned.
Remove and reattach them correctly to avoid any shadows, vignetting, or other issues.
Check for lens flare prevention: Lens flare caused by obstructions like bright lights can sometimes be minimized by adjusting the shooting angle or using lens hoods to block unwanted light. Experiment with different shooting positions or shield the lens from the light source to reduce flare.
Test and evaluate: After addressing the potential obstructions, test the camera to ensure the issues have been resolved. Capture test shots and carefully inspect them for any remaining signs of obstructions or related problems.
Film Scanner Obstructions
Obstructions in your camera can take the form of hair, dust, or unidentified substances, and can even include the protective paper backing on your 120 film.
When you examine your film scans, you'll notice these obstructions appearing as dark marks, often spanning across multiple frames in a row.
To prevent and address the challenges posed by obstructions in your camera, it's crucial to understand how to recognize them and take proactive measures to keep your equipment clean.
What are common issues with film scanner obstructions?
Loss of image detail: Obstructions in the film scanner, such as dust particles or debris, can obstruct the scanning process and result in a loss of image detail.
These obstructions may create small shadows or block light from reaching the film surface, leading to reduced sharpness and clarity in the scanned images.
Image artifacts: Film scanner obstructions can introduce various artifacts into the scanned images. Examples include scratches, streaks, or smudges that appear as unwanted lines or marks on the scanned images.
These artifacts can negatively impact the overall image quality and require additional post-processing to remove.
Color shifts and inaccuracies: Obstructions in the film scanner can affect the accuracy of color reproduction during the scanning process. Dust particles or debris may alter the way light is captured and interpreted, resulting in color shifts or inaccuracies in the scanned images.
This can affect the overall color balance, saturation, and vibrancy of the scanned film.
Reduced dynamic range: Film scanner obstructions can cause a reduction in the dynamic range of the scanned images. Shadows may appear darker, and highlights may lack detail and appear overexposed or washed out.
This loss of dynamic range can result in less visually appealing and less accurate representations of the original film.
Increased image noise: Obstructions in the film scanner can introduce additional noise or grain into the scanned images. Dust particles or debris can create specks or spots that appear as unwanted visual noise, reducing the overall image quality and clarity.
To mitigate these issues, it is essential to keep the film scanner clean and free from obstructions. Regular maintenance, including proper cleaning of the scanner components, can help minimize the impact of obstructions on the scanned film images.
How do I fix film scanner obstructions?
Power off and unplug the scanner: Before attempting any cleaning, ensure the scanner is turned off and disconnected from the power source to avoid any electrical hazards.
Clean the scanner glass: Start by cleaning the glass surface where the film is placed. Use a lint-free microfiber cloth and a mild glass cleaner to gently wipe the glass in a circular motion.
Be cautious not to apply excessive pressure to avoid damaging the glass.
Remove dust and debris: Use a soft brush or a can of compressed air to carefully remove any dust particles or debris from the scanner glass, film holders, or other accessible parts.
Be gentle to prevent scratching the glass or dislodging any internal components.
Clean the film holders: If the film holders have accumulated dust or debris, clean them using a soft brush or a can of compressed air. Ensure that no particles are present that could interfere with the film during scanning.
Check and clean the film path: Some scanners have a film path or transport mechanism. Inspect this area for any visible obstructions or dust. If necessary, refer to the scanner's user manual for instructions on safely accessing and cleaning the film path.
Test with a blank scan: After cleaning, perform a test scan using a blank or unexposed portion of film. This can help verify if any remaining obstructions or artifacts are still affecting the scanning process. Evaluate the test scan for any signs of lingering issues.
Repeat cleaning if necessary: If the test scan still shows obstructions or artifacts, repeat the cleaning process, paying extra attention to detail and ensuring all accessible areas are thoroughly cleaned.

Light Leaks
Light leaks occur when unwanted light seeps into your camera, typically due to damaged or worn light-tight seals in the camera back.
These light leaks will appear as faded or discolored streaks or bursts in your scans, extending beyond the frame to the rebate edge.
Understanding the causes and solutions of light leaks is crucial to maintaining the integrity of your photographs and achieving the desired results.
What are common issues with light leaks?
Overexposure: Light leaks allow additional light to reach the film, resulting in overexposure. This can cause the affected areas of the image to appear washed out, lacking detail, and potentially losing important highlights.
Flare and ghosting: Light leaks can introduce flare and ghosting effects into the image. These appear as unwanted artifacts, bright spots, or streaks that can reduce contrast, create hazy areas, and negatively impact image quality.
Color shifts: Light leaks can cause color shifts in the image. The additional light entering the camera can affect the color reproduction, resulting in inaccurate or inconsistent colors, shifts in color balance, or a loss of color saturation.
Unpredictable patterns: Light leaks can create unpredictable and inconsistent patterns on the image. The specific location and intensity of the leaks can vary, leading to irregular patches of light or uneven exposures within the frame.
Loss of sharpness and detail: Light leaks can introduce softness and reduced sharpness to the image. The scattered light can create a diffusion effect, causing a loss of fine details and overall image clarity.
Unwanted marks and artifacts: Light leaks can create various unwanted marks, streaks, or lines on the image. These can appear as irregular shapes or patterns that are unrelated to the subject, resulting in distractions and a degradation of image quality.
How do I fix light leaks?
Inspect the camera: Carefully examine the camera body for any visible gaps, cracks, or openings where light may be leaking. Pay close attention to areas around the film door, seals, hinges, or any other potential entry points for light. If you identify any issues, consider seeking professional repair or replacing the faulty components.
Check the film door seals: Inspect the seals around the film door to ensure they are intact and free from damage. If the seals are worn out or deteriorated, they may need to be replaced. Consult the camera manufacturer or a professional repair technician for appropriate replacement seals.
Seal any light leaks: If you identify specific areas where light is leaking, you can use light-blocking materials to seal the leaks. Black electrical tape or light-blocking foam can be effective in covering small openings or gaps. Apply the material carefully and securely, ensuring that it does not interfere with the camera's functionality.
Use a film changing bag: If light leaks occur during film loading or unloading, consider using a film changing bag or a darkroom to perform these tasks in a light-tight environment. This can minimize the risk of exposing the film to unwanted light.
Test with dummy rolls: After addressing potential light leaks, conduct test rolls with unimportant or blank film to verify if the issue has been resolved. Process the test rolls and carefully examine the resulting images for any signs of remaining light leaks.
Adjust shooting techniques: If you encounter persistent light leaks despite attempting to address them, you can adjust your shooting techniques to minimize their impact. This may include avoiding direct sunlight hitting the camera, shielding the camera from light sources, or using lens hoods to reduce the chance of flare and ghosting.

Camera Fogging
Fogging can occur due to various factors, including heat damage, aging of film, or accidental exposure to light during the shooting process.
Fogging manifests as a fading and discoloration of the film surface, similar to a light leak. However, unlike a light leak that emanates from a concentrated spot, fogging affects the film surface more evenly overall.
Understanding the causes and characteristics of fogging is essential in troubleshooting and finding the appropriate solutions to maintain the quality of your photographs.
What are common issues with camera fogging?
Reduced image clarity: Camera fogging can result in reduced image clarity and sharpness. The presence of fog or haze can cause a loss of fine details and make the image appear softer or less defined.
Loss of contrast: Fogging can lead to a reduction in contrast within the image. The fog or haze can diffuse light and make the tones appear less distinct, resulting in a loss of depth and overall visual impact.
Color shifts: Moisture or condensation on the lens or sensor can cause color shifts in the image. Colors may appear muted, washed out, or inaccurately rendered. This can result in a loss of vibrancy and affect the overall color balance.
Unwanted artifacts: Camera fogging can introduce unwanted artifacts into the image. Water droplets or smudges on the lens or sensor can create spots, streaks, or distortions that degrade the image quality.
Loss of image detail: In severe cases, heavy fogging can completely obscure details within the image. This can make it difficult or impossible to discern objects or elements in the photograph, resulting in a loss of information and visual impact.
Environment: Camera fogging can also occur due to environmental factors such as sudden temperature changes, high humidity, or inadequate sealing of the camera body.
How do I fix camera fogging?
Identify the source: Determine the source of the fog or haze. It could be due to condensation on the lens, moisture inside the camera body, or other factors. Understanding the source will help guide your approach to fixing the issue.
Remove the moisture: If there is visible condensation on the lens or inside the camera, carefully wipe it away using a clean, lint-free cloth. Be gentle and avoid exerting excessive pressure on the lens or sensitive camera components.
Dry the camera: If the fogging is caused by internal moisture, remove the batteries and memory card, and open up any access points to the camera's internal components. Place the camera in a dry environment with good airflow, such as a room with low humidity or near a fan, for a period of time to allow the moisture to evaporate. Avoid exposing the camera to extreme temperatures, as rapid temperature changes can lead to further condensation.
Use silica gel or desiccant: To help absorb moisture and prevent future fogging, consider placing silica gel packets or a desiccant in the camera bag or storage case. These absorbent materials can help maintain a dry environment and reduce the likelihood of moisture-related issues.
Prevention measures: Take preventive measures to minimize the risk of camera fogging in the future. Avoid sudden temperature changes, particularly when transitioning between indoor and outdoor environments. Use protective camera cases or bags to shield the camera from excessive moisture and humidity. Allow the camera to acclimate to changes in temperature and humidity gradually.

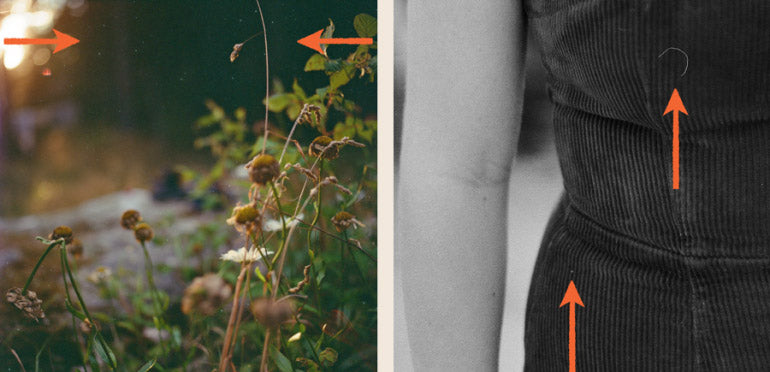
Camera Flares
Flares occur when light refracts and reflects within your lens, typically when your subject is backlit and you are pointing your camera directly at the sun.
These flares manifest as bright, low-contrast, muddy, or discolored patches in your images. While they can appear in various areas, they often develop in the corners of the frame.
Understanding the causes and characteristics of flares is essential to minimize their impact on your photographs and achieve the desired visual outcome.
What are common issues with camera flares?
Reduced contrast: Flares can reduce the contrast in an image by scattering light across the frame. This can result in a loss of definition and make the image appear flatter.
Loss of detail: Flares can obscure or wash out details in the image. They can create bright areas or streaks of light that cover important elements and reduce the overall clarity of the photograph.
Color shifts: Flares can introduce color shifts or tinting in the image. The scattered light can alter the color balance, resulting in inaccurate or unnatural color reproduction.
Unwanted artifacts: Flares can create unwanted artifacts such as streaks, halos, or circles of light. These artifacts can be distracting and detract from the intended composition of the photograph.
Decreased image quality: Flares can reduce the overall image quality by introducing haze, reducing sharpness, or creating a loss of fine details. This can result in a softer or less defined image.
Loss of dynamic range: Flares can reduce the dynamic range of the image by causing areas of overexposure or blown-out highlights. This can result in a loss of detail in bright areas and limit the tonal range of the photograph.
How do I fix camera flares?
Identify the source of the flare: Determine the specific factors contributing to the flares, such as the angle and intensity of light entering the lens, lens coatings, or the presence of light sources within the frame.
Adjust shooting angle: Changing your shooting angle can help reduce or eliminate flares. Experiment with different perspectives and positions to find angles that minimize the direct entry of light into the lens, especially from strong light sources.
Use a lens hood or lens shade: A lens hood is a device that attaches to the front of the lens to block unwanted light from entering the lens. It can help reduce the occurrence of flares by shading the lens from direct light sources. Ensure you have the appropriate lens hood for your lens and use it when shooting in situations prone to flares.
Shield the lens from light sources: If you cannot use a lens hood or want to further minimize flares, you can physically shield the lens from direct light sources. This can be done by using your hand, a piece of cardboard, or any other object that can block or redirect the light away from the lens.
Adjust aperture and focal length: Flares can be more prevalent at wider apertures, so consider closing down the aperture (using a higher f-number) to reduce the chances of flare occurrence. Additionally, experimenting with different focal lengths may help find a range where flares are less likely to appear.
Use lens coatings: Some lenses have specialized coatings to reduce flares and improve contrast. If you experience persistent flares, consider using lenses with better anti-reflective coatings or investing in high-quality lenses known for their flare-resistant properties.
Post-processing adjustments: If you still have minor flares present in your images, you can attempt to reduce their visibility through post-processing software. Techniques such as local adjustments, selective contrast adjustments, or targeted cloning can help minimize the impact of flares.

Loose Film Roll
A loose film roll refers to the condition when medium format 120 or 220 film is not tightly rolled after exposure.
This can occur due to improper securing of the film with tape or film strip adhesive, causing it to unravel. In some cases, cameras with inadequate film winding mechanisms, such as disposable cameras, may also contribute to loose film rolls.
The presence of a soft red or white line across the entire edge of your scanned frame, often referred to as "edge fog," is a telltale sign of a loose film roll.
Understanding the causes and consequences of loose film rolls is essential to maintaining the integrity of your photographs and implementing effective solutions.
What are common issues with loose film rolls?
Uneven film tension: When the film is loose within the roll, it can result in uneven tension. Uneven tension can lead to film slippage or movement during the shooting process, resulting in misalignment and potential loss of framing or focus.
Light leaks: Loose film rolls can allow light to enter the roll, causing light leaks. These leaks can expose the film to unwanted light, resulting in overexposed or fogged areas on the film.
Film damage: If the film is not securely wound within the roll, it can become susceptible to damage. Loose film can become scratched, creased, or torn, leading to visible defects and compromised image quality.
Difficult film loading and unloading: Loose film rolls can make loading and unloading the film more challenging. Loose film may not properly engage with the film transport mechanism, leading to feeding issues, jams, or failure to advance the film correctly.
Film curling: When film is loose, it can become prone to curling or buckling. Curled film can be difficult to handle, scan, or print properly, resulting in additional challenges during the post-processing or printing stages.
How do I fix loose film rolls?
Assess the film roll: Open the film canister or storage container and visually inspect the film roll. Check for any signs of uneven winding, slack sections, or loose film within the roll.
Rewind the film: If you notice loose or slack sections, gently rewind the film by rotating the film spool or using the film rewind crank, ensuring that the film is tightly wound and properly tensioned within the canister. Be careful not to overwind or cause excessive tension that could damage the film.
Use film leader retriever: If the film has become detached from the spool or is difficult to wind manually, you can use a film leader retriever tool to grip and wind the film back onto the spool. Follow the instructions provided with the tool to safely and effectively reattach the film to the spool.
Secure the film: Once the film is properly rewound, ensure that it is securely held in place within the canister. Check that any locking mechanisms or tabs are engaged to prevent the film from unwinding or becoming loose again.
Store properly: After fixing the loose film roll, store the film canister or storage container in a cool and dry environment to maintain the integrity of the film. Avoid exposing the film to excessive heat, humidity, or direct sunlight, as these conditions can lead to further film deterioration or loosening.

Film Opened Mid Roll
The impact of a camera opening mid-film roll is evident in the scanned images, with large blocks displaying discoloration. This can range from an orange-red tint on parts of the image to complete bleaching out.
The damage covers not only the frame line and rebate edge but extends much larger than a regular light leak.
Recognizing and understanding the consequences of a camera opening mid-film roll is essential for minimizing such incidents in the future and taking appropriate measures to salvage affected images.
What are common issues with film opened mid roll?
Overexposure: Opening the film mid-roll exposes a portion of the film to light, resulting in overexposure of the exposed frames. The excess light can cause loss of detail, washed-out colors, and reduced dynamic range in the affected frames.
Light leaks: Opening the film mid-roll can introduce light leaks into the film roll. Light leaks can occur at the point where the film was opened or if the roll is not properly resealed, allowing light to enter and affect the unexposed frames.
Fogging: When a film roll is opened mid-roll, there is a risk of fogging the unexposed frames. Fogging can occur due to exposure to light or other environmental factors, resulting in a loss of contrast, increased image noise, and reduced image quality.
Unpredictable frame numbering: Opening the film mid-roll can disrupt the sequential numbering of the frames. This can make it difficult to keep track of the exposure order and may cause confusion during the film processing or scanning stage.
Film waste: Opening the film mid-roll often results in wasted frames. Any frames that were exposed but not yet fully used are likely to be unusable due to overexposure, light leaks, or fogging.
To minimize the impact of opening the film mid-roll, it is advisable to handle film rolls in a light-tight environment or a darkroom.
If you accidentally open the film mid-roll, it's best to proceed with shooting the remaining frames and then have the film processed accordingly.
How do I fix film opened mid-roll?
Steps you can take to address film opened mid-roll include:
Note the exposure order: Keep track of the order of the frames you shoot after the film was opened. This will help during the processing and scanning stage to identify which frames were exposed after the mid-roll opening.
Inform the lab or technician: When sending the film for processing, inform the lab or technician about the situation. Provide them with any necessary details, such as the frame numbers where the film was opened, to ensure they handle the film appropriately.
Discuss processing options: Consult with the lab or technician about the best way to handle the film. They may suggest specific processing techniques or adjustments to compensate for the compromised frames.
Accept the potential loss: Be prepared for the fact that the frames exposed before the film was opened may not produce the desired results. They might be overexposed, have light leaks, or suffer from other issues. Accept that these frames may be lost or have unexpected outcomes.
Post-processing adjustments: If the exposed frames have visible flaws or issues, you can consider post-processing adjustments to mitigate their impact. Techniques like selective exposure adjustments, cropping, or creative editing can help salvage some aspects of the affected frames.
BONUS: If any of these issues are spotted in your film order, our dedicated team will make note of them on Richard's Film Report, which you'll receive along with your scans.


Camera Advancement Malfunction
Camera advancement malfunction refers to the irregular movement of film through the camera body, deviating from the expected uniformity.
When examining your negatives, you will notice frames that are either too far apart, resulting in fewer frames on the roll, or frames that overlap, leading to double exposures over a portion of the scan.
Recognizing the signs of camera advancement malfunction is crucial for understanding the cause and implementing appropriate solutions to rectify the issue.
What are common issues with camera advancement malfunction?
Overlapping frames: When the camera fails to advance the film, subsequent frames can overlap with each other. This results in multiple exposures on the same frame, causing a jumbled and unusable image.
Partially exposed frames: In some cases, the film may only be partially advanced, resulting in a portion of the next frame overlapping with the current frame. This leads to a partially exposed image with overlapping or distorted content.
Uneven spacing between frames: If the camera advancement mechanism malfunctions intermittently, it can result in uneven spacing between frames. This leads to inconsistent framing and can disrupt the composition of the images.
Film jams or misalignments: A malfunctioning film advancement mechanism can cause film jams or misalignments, resulting in the film becoming stuck or improperly positioned within the camera. This can prevent proper exposure or film advancement altogether.
Film tearing or ripping: In more severe cases of camera advancement malfunction, the film may get caught or damaged within the camera, leading to film tearing or ripping. This can result in significant loss of images or damage to the film.
Film waste and increased cost: Camera advancement malfunction can lead to wasted film as frames may be improperly exposed or overlap. This increases the cost of shooting and developing film, as unusable frames may need to be discarded.
Camera advancement malfunction can be frustrating and can significantly impact the outcome of a photography session.
How do I fix camera advancement malfunction?
Check the film transport system: Inspect the camera's film transport system, including the film advance lever or motor, gears, and other related components. Look for any visible damage, obstructions, or misalignments that may be causing the malfunction.
Ensure proper film loading: Make sure you are correctly loading the film into the camera according to the manufacturer's instructions. Improper film loading can cause issues with the film advancement mechanism.
Clean the film path: Dust, debris, or residue within the camera's film path can impede the smooth movement of the film. Use a clean, lint-free cloth or an air blower to gently remove any foreign particles that may be affecting the film transport.
Check the battery/power source: In the case of motorized advancements, ensure that the camera has sufficient power from the battery or power source. Weak or dying batteries can cause inconsistent or incomplete film advancements.
Test with different film: Occasionally, film incompatibility issues can cause advancement problems. Try using a different roll of film from a reputable brand to see if the issue persists.
Avoid excessive force: While troubleshooting, avoid applying excessive force to the film advance lever or other camera controls. Forceful actions can potentially worsen the problem or cause additional damage.

Twin Check Sticker
Twin check stickers are applied to the film in the darkroom before processing to assist in tracking it through the lab.
Typically, this portion of the film does not contain an image frame. If an image frame appears on this section, it suggests a camera advancement malfunction or a film-loading error.
The recognition of a sticker on the last frame of the roll and the presence of a big white rectangle on the corresponding scan are clear indicators of the presence of a twin check sticker.
Understanding the significance of twin check stickers helps identify potential camera advancement issues or film-loading errors and prompts the need for corrective measures.
What are common issues with twin check stickers?
Image obstruction: If the sticker is placed in an area where there should be image frames, it can obstruct or partially cover the captured images on the negatives. This can result in parts of the image being obscured or blocked by the sticker, leading to a loss of image detail or unwanted visual elements.
Light leaks: Depending on the adhesive properties and opacity of the sticker, it can create a potential for light leaks. Light leaks occur when unwanted light enters the camera or film during exposure, causing unwanted streaks, fogging, or overexposure on the negatives. The sticker may not provide a complete light seal and can contribute to light leakage.
Damage during removal: If the sticker is not carefully removed from the negatives, it can cause physical damage to the film surface. Improper removal techniques or using adhesive materials that leave residue can scratch or mar the film emulsion, affecting the quality of the negatives and potentially rendering them unusable.
Contamination: Stickers or adhesive materials can introduce contaminants to the film, such as dust, fibers, or residue. These contaminants can affect the film's appearance and quality, leading to visible artifacts or degradation of the image.
Image obstruction: Examine the areas covered by the sticker to see if any portion of the captured images is obstructed or partially covered. The sticker may have blocked a part of the image, resulting in missing or obscured details.
Color or tonal variations: Carefully observe the color and tonal consistency of the images on the negatives. Damage from a sticker may introduce variations in color balance, tonal range, or overall image quality in the affected areas.
How do I fix twin check sticker damage?
Assess the extent of the damage: Carefully examine the negatives to determine the nature and severity of the damage caused by the twin check stickers. Evaluate the scratches, marks, residue, or image obstructions to understand the specific issues that need to be addressed.
Consult a professional lab or film expert: Seek advice from a professional lab or film expert experienced in negative restoration. They can assess the damage and provide guidance on the appropriate techniques or services available to restore the affected areas.
Digital restoration: If the damage is relatively minor, you may be able to digitally restore the affected images. Scanning the negatives and using image editing software with retouching capabilities can help reduce the visibility of scratches, marks, or image obstructions. However, this process requires advanced skills and should be approached with caution to avoid further damage.
Professional restoration services: In cases of significant damage or when you lack the necessary expertise, consider utilizing professional restoration services. There are specialized labs and technicians who offer restoration services specifically for damaged film negatives. They have the knowledge, tools, and techniques to carefully repair and restore the affected areas.
Prevention for future negatives: To prevent similar damage in the future, it is important to use appropriate labeling techniques that do not harm the negatives. Avoid using stickers or adhesives that may leave residue or cause physical damage. Instead, consider using non-destructive methods such as marking the film canister or using archival sleeves or envelopes to keep track of your negatives.

Shutter Sync Malfunction
Shutter sync malfunction occurs when using a flash with a camera equipped with a curtain shutter.
The "sync speed" represents the fastest shutter speed that should be used to ensure proper synchronization between the flash and the shutter. If a faster shutter speed is set, the shutter begins to close before the flash has fired, resulting in a portion of the frame being blocked and underexposed.
The recognition of a thick, black, uniform line across the image that extends to the edge of the frame is a clear indication of a shutter sync malfunction.
Understanding the concept of sync speed and the potential issues associated with shutter sync malfunctions is crucial for achieving properly exposed images with flash photography.
What are common issues with shutter sync malfunctions?
Inconsistent or incorrect exposure: A malfunctioning shutter sync can result in inconsistent or incorrect exposure when using external flash units. The flash may not fire at the correct time, resulting in underexposed or overexposed images.
Flash not firing or firing prematurely: The malfunctioning shutter sync can cause the external flash to not fire at all or fire before the shutter is fully open. This can lead to images with partial or no flash illumination, impacting the overall lighting balance and desired effects.
Flash synchronization artifacts: When the shutter sync is not functioning properly, it can cause synchronization artifacts, such as partial illumination, banding, or uneven lighting in the image. These artifacts can be distracting and degrade the overall image quality.
Limited flash synchronization options: Some advanced flash techniques, such as high-speed sync or rear curtain sync, may not be possible or may not work correctly with a malfunctioning shutter sync. This limits the creative control and versatility of flash photography.
Incompatibility with specific flash units: Certain flash units may require precise synchronization with the camera's shutter mechanism. If the shutter sync is malfunctioning, it can lead to compatibility issues with specific flash units, resulting in unreliable or erratic performance.
How do I fix shutter sync malfunctions?
Check connections: Ensure that all connections between the camera and external flash units are secure and properly seated. Loose connections can cause sync issues, so double-check all cables, hot shoe contacts, or wireless trigger connections.
Clean contacts: Dirty or oxidized contacts can interfere with proper communication between the camera and flash units. Clean the contacts on both the camera and flash units using an appropriate cleaning solution or a soft cloth to ensure good electrical contact.
Test different flash units: If possible, try using different flash units to determine if the issue is specific to a particular flash unit or a general problem with the camera's shutter sync.
Professional repair: If the problem persists or if the camera is under warranty, consider contacting the camera manufacturer or a qualified camera technician for repair or servicing. They can diagnose the specific issue and repair or replace the faulty components if necessary.

Camera Scratches
Camera scratches occur when dust, dirt, or sand find their way into the camera insert or camera back, resulting in scratches on either the base side or emulsion side of the film. Scratches on the base side can be caused by foreign particles inside the camera, while scratches on the emulsion side may be due to dirt, nicks, or sticky rollers.
What are common issues with camera scratches?
Scratches on the film base: Dust particles, dirt, or sand can act as abrasives and create scratches on the base side of the film. These scratches can appear as lines or marks on the developed negatives and can potentially affect image quality by introducing visible defects.
Scratches on the emulsion side: If dust, dirt, or sand particles come into contact with the emulsion side of the film, they can cause scratches that directly impact the image area. These scratches can result in loss of detail, reduced image clarity, or unwanted artifacts in the final photographs.
Image artifacts: Dust, dirt, or sand on the film surface can create artifacts on the captured images. They may appear as spots, smudges, or irregularities in the developed film, leading to distractions or blemishes in the photographs.
Light scattering or diffusion: Dust particles on the film surface can scatter or diffuse light during exposure, causing a loss of sharpness, reduced contrast, or a softening effect in the images. This can result in a loss of overall image quality and fine detail.
How do I fix camera scratches?
Prevention: The best approach is to prevent camera scratches from occurring in the first place. Handle your camera with care, avoid exposing it to abrasive surfaces, and keep it protected in a camera bag or case when not in use.
Assess the severity: Evaluate the severity of the scratch. If it is minor and does not significantly affect image quality, it may be acceptable to leave it as is. However, if the scratch is causing noticeable image degradation, it may require repair.
Professional repair: For scratches on the camera's film gate or image sensor, it is recommended to seek professional assistance from a reputable camera repair service or manufacturer-authorized service center. These professionals have the expertise and specialized tools to assess and repair the specific components that are affected.
Software correction: In some cases, software tools can help minimize the visibility of scratches or correct their effects on digital images. Image editing software like Adobe Photoshop or Lightroom may offer tools for retouching or spot healing to reduce the appearance of scratches. However, these methods may have limitations, especially for deep or severe scratches.
Replacement parts: In certain situations, if the scratch is on a removable component, such as a lens or filter, it may be possible to replace the affected part. Consult with the camera manufacturer or a qualified technician to determine if replacement parts are available and can be installed to address the issue.

Handling Damage
Handling damage refers to scratches or dents that occur on your film negatives as a result of mishandling during the film processing stage or inadequate storage conditions.
Recognizing handling damage is characterized by the appearance of light-colored lines (scratches) or crescents (dents) on your film scans. These marks are not geometric or uniform in shape and vary in appearance across multiple frames.
Understanding the causes and visual characteristics of handling damage is crucial for maintaining the integrity of your film negatives and addressing potential issues related to film processing and storage.
What are common problems with handling damage?
Image degradation: Scratches or dents on the film negatives can directly affect the image area, resulting in visible defects, loss of detail, or distortion in the final photographs. These imperfections can detract from the overall image quality and clarity.
Light scattering or diffraction: Scratches or dents on the film surface can cause light to scatter or diffract during exposure. This can lead to a loss of sharpness, reduced contrast, or a softening effect in the images. The scattered light can degrade the overall image quality and fine detail.
Increased susceptibility to damage: Once film negatives have scratches or dents, they become more vulnerable to further damage. The damaged areas are more prone to accumulating dust, attracting residue, or experiencing additional scratches during subsequent handling or storage.
Limited post-processing options: Scratches or dents on the film negatives can limit the post-processing options and creative control during the printing or scanning stage. These imperfections may require additional time and effort to correct or remove digitally, potentially compromising the final image quality.
Loss of archival quality: Scratches or dents can reduce the archival quality and longevity of the film negatives. Over time, the damaged areas may be more susceptible to fading, discoloration, or other deterioration, compromising the long-term preservation of the images.
How do I fix handling damage?
Digital restoration: Scan the damaged negatives and use image editing software with retouching capabilities to digitally repair the scratches or dents. This involves carefully retouching the affected areas using techniques such as cloning, healing, or spot removal to reduce the visibility of the damage. However, this method requires advanced skills and may not be suitable for severe or extensive damage.
Darkroom techniques: If you have the necessary skills and equipment, you can attempt to repair the scratches or dents using darkroom techniques. This involves manually retouching the physical negatives using specialized tools and materials. Darkroom techniques require precision and expertise, so it is advisable to seek guidance from experienced professionals or attend workshops to learn these techniques properly.
Professional restoration services: For severe or extensive damage, it is recommended to seek professional restoration services from reputable film restoration labs or technicians. They have the expertise, specialized equipment, and techniques to repair and restore damaged film negatives. These professionals can perform processes such as wet-mounting, spot retouching, or specialized chemical treatments to minimize the visibility of the scratches or dents.
Acceptance and preservation: In some cases, it may not be feasible to completely eliminate the damage. Accepting the presence of the scratches or dents as part of the film's history can be an option. Focus on preserving the negatives in suitable archival storage to prevent further degradation and ensure their longevity.

Film Scan Lines
Scan lines occur when dust or dirt particles obstruct the film scanning equipment during the scanning process, resulting in visible lines on the scanned images.
Recognizing scan lines is characterized by the presence of thin, straight lines across the scanned image. These lines can be differentiated from pressure plate scratches by the visible digital noise around the line.
Understanding the causes and visual characteristics of scan lines is essential for ensuring the cleanliness and proper functioning of the film scanning equipment.
What are common issues with film scan lines?
Image distortion: Scan lines can cause distortion or disruption in the appearance of the image. They can result in uneven tonal values, color shifts, or disruptions in the overall image quality, leading to a loss of detail or accuracy.
Reduced image resolution: The presence of scan lines can reduce the perceived resolution of the scanned image. The lines may cause blurring or pixelation, resulting in a loss of sharpness and fine details in the final digital representation.
Artifacts and visual distractions: Scan lines can be visually distracting and create unwanted artifacts in the image. They can disrupt the smoothness and continuity of the image, making it less aesthetically pleasing and potentially diminishing its overall impact.
Limitations in post-processing: The presence of scan lines can complicate or limit post-processing options. It can be challenging to effectively correct or adjust the image when there are prominent scan lines present. This can restrict creative editing possibilities and hinder the achievement of the desired final result.
Time-consuming correction: Removing or minimizing scan lines in post-processing can be time-consuming and require advanced skills in image editing software. It often involves precise retouching or specialized techniques to reduce or eliminate the visible lines, adding to the overall workflow time and complexity.
How do I fix film scan lines?
Rescan the film: If scan lines are consistently present across multiple frames or images, consider rescanning the film using different scanning settings or equipment. Adjusting the scanning resolution, exposure, or other settings may help reduce or eliminate the scan lines.
Software adjustments: Use image editing software to minimize the visibility of scan lines. Experiment with different tools and adjustments, such as noise reduction filters, sharpening, or cloning tools. These adjustments can help reduce the prominence of scan lines or blend them more seamlessly into the image.
Blend or average multiple scans: If you have multiple scans of the same image, you can try blending or averaging them to reduce the visibility of scan lines. This technique involves overlaying multiple scans and blending them together using transparency or blending modes in image editing software. It can help smooth out the scan lines and improve the overall image quality.
Manual retouching: For severe scan lines, you may need to manually retouch the affected areas using cloning or healing tools in image editing software. This technique requires precision and patience to carefully replicate the surrounding pixels and blend them with the affected areas to minimize the visibility of the scan lines.
Professional restoration services: If the scan lines persist or if the damage is extensive, consider seeking professional restoration services from reputable image restoration specialists or photo labs. They have expertise in dealing with scan line issues and may employ specialized techniques and equipment to restore the images.

The "Staircase Effect"
The staircase effect refers to the presence of soft, evenly-spaced dark bands on film photo images. The exact cause of this issue is uncertain, but it is speculated that reflections from the film itself during the standard operation of the scanning machine could be a possible culprit.
Understanding the potential causes and visual characteristics of the staircase effect is essential for preventing overexposure in negatives and addressing this issue in the scanning process.
What are common issues with the "staircase effect"?
Loss of detail: The jagged appearance of lines can result in a loss of fine detail in the image. Straight or diagonal lines that should be smooth and continuous appear pixelated and distorted, leading to a reduction in image clarity and sharpness.
Visual distractions: The staircase effect can be visually distracting, drawing attention away from the subject or intended composition. The jagged lines can disrupt the overall visual flow of the image and hinder the viewer's ability to perceive the image as intended.
Inaccurate representation: The jagged lines created by the staircase effect can deviate from the actual shape or form of the subject being captured. This can result in an inaccurate representation of the subject and compromise the fidelity of the image.
Limitations in post-processing: The presence of the staircase effect can make post-processing tasks, such as resizing or scaling the image, more challenging. The jagged lines may become more pronounced or exaggerated during these operations, further degrading the image quality.
Moiré patterns: In some cases, the staircase effect can interact with patterns or textures in the scene, leading to the formation of unwanted moiré patterns. These patterns manifest as undesirable interference or wavy artifacts, further diminishing the visual quality of the image.
How do I fix the "staircase effect"?
Anti-aliasing filters: If you're capturing images with a digital camera, enable or utilize the anti-aliasing filter if available. This filter intentionally blurs or reduces high-frequency details during image capture, reducing the staircase effect.
Resampling and interpolation: When resizing or resampling the image, use interpolation algorithms that incorporate anti-aliasing techniques. These algorithms help smooth out the jagged edges and reduce the staircase effect. Common interpolation methods include bicubic, Lanczos, or spline interpolation.
Image editing software: Use image editing software with anti-aliasing capabilities to reduce the visibility of the staircase effect. Here are a few techniques you can try:
Blur or soften edges: Apply a mild blur or softening effect to the edges of the affected lines or areas. This helps to smooth out the jaggedness and create a more natural appearance.
Feather or mask edges: Create feathered or masked selections along the edges of the lines and apply adjustments selectively to soften the transition between colors or tones.
Sharpening with restraint: Apply sharpening techniques with caution to enhance edge details, but be careful not to amplify the staircase effect. Use selective sharpening tools or apply sharpening with low strength to avoid exaggerating the jaggedness.
Retouching and manual editing: In some cases, you may need to manually retouch the affected areas using cloning or healing tools in image editing software. This technique involves carefully reconstructing the jagged lines or edges to create smoother and more natural-looking results. This method requires precision and patience.
High-resolution capture or rescan: If possible, consider capturing the image at a higher resolution or rescanning the original film or negative using a higher-quality scanner. Increasing the resolution provides more information to work with and can help minimize the visibility of the staircase effect.

Water Damage
Water damage occurs when film comes into contact with moisture, leading to various visual effects such as irregular waves, speckled patterns, large black splotches, and extreme discoloration. These damages exhibit a distinct "liquid" appearance.
Recognizing water damage is characterized by the presence of visual abnormalities with a distinctly "liquid" look, including irregular waves, speckled patterns, large black splotches, and extreme discoloration.
Understanding the causes and visual characteristics of water damage is crucial for taking immediate action and minimizing the potential impact on your film images.
What are the common issues with water damage?
Physical damage: Water can cause physical damage to photographic equipment, prints, film negatives, or digital storage media. It can lead to warping, swelling, or disintegration of materials, rendering them unusable or prone to further deterioration.
Image degradation: Water can result in the loss of image quality in prints, film negatives, or digital files. It can introduce stains, smudges, or discoloration, leading to a reduction in image clarity, sharpness, or color accuracy.
Mold and fungus growth: Moisture from water damage creates an ideal environment for mold and fungus to grow. These organisms can cause unsightly spots, patches, or mold growth on photographic materials, leading to permanent damage and compromising the integrity of the images.
Loss of archival value: Water damage can significantly impact the archival value of photographs. It can cause fading, deterioration, or loss of image integrity over time, reducing their long-term preservation and archival quality.
Data loss: If water damage affects digital storage media, such as memory cards or hard drives, it can lead to data loss or corruption. This can result in the permanent loss of digital files, including photographs, videos, or other important data.
Equipment malfunction: Water damage can lead to equipment malfunction, especially in cameras or other electronic devices. It can cause corrosion or rusting of metal components, electrical damage, or impaired functionality, rendering the equipment inoperable or unreliable.
Costly repairs or replacements: Repairing or replacing water-damaged equipment or materials can be expensive. Depending on the severity of the damage, professional restoration services or the purchase of new equipment may be necessary, resulting in additional costs.
Emotional and sentimental loss: Water damage can cause the loss of irreplaceable photographs or memories, leading to emotional distress and sentimental loss. These images may hold significant personal or historical value, making the damage particularly disheartening.
How do I fix water damage?
Act quickly: Time is of the essence when dealing with water damage. Begin the drying and restoration process as soon as possible to prevent further damage and mold growth.
Separate wet items: Remove any wet photographic equipment, prints, film negatives, or digital storage media from the water source or affected area. Separate them to prevent further contact with moisture or potential contamination.
Dry gently: Gently dry the affected items using absorbent materials such as clean, soft towels or lint-free cloths. Pat dry rather than rubbing to avoid causing additional damage.
Air drying: Allow the items to air dry in a well-ventilated area. Avoid direct sunlight or excessive heat, which can cause further damage. Use fans or dehumidifiers to enhance air circulation and speed up the drying process.
Mold prevention: If mold or fungus growth is a concern, consider using a dehumidifier or placing moisture-absorbing materials, like silica gel packets, near the affected items to help control humidity and inhibit mold growth.
Professional assessment and restoration: Depending on the severity of the water damage and the value of the affected items, it may be advisable to seek professional assistance from a reputable restoration service or photographic technician.
They can assess the extent of the damage and provide specialized restoration techniques for salvaging the affected items.
Data recovery: In the case of water damage to digital storage media, such as memory cards or hard drives, consult with data recovery specialists if there is a risk of data loss. They may be able to recover and restore the damaged data, but keep in mind that success is not guaranteed.

X-Ray Damage
X-ray damage occurs when film is exposed to electromagnetic radiation, commonly encountered when traveling by plane and subjecting film to X-ray scanners used for luggage screening.
Recognizing x-ray damage is characterized by the presence of a large, wavy pattern that extends across the entire roll of negatives.
Understanding the causes and visual characteristics of x-ray damage is crucial for taking precautionary measures and protecting your film from potential harm during air travel.
What are the common issues with X-ray damage?
Film fogging: X-ray radiation can cause fogging or exposure of the film, resulting in an overall loss of image quality. The fogging can appear as a general haziness, reduced contrast, and loss of detail in the final image.
Color shifts: X-ray radiation can lead to color shifts in color film. The colors may become altered or skewed, resulting in inaccurate or unnatural color representation in the final image.
Loss of sensitivity: X-ray radiation can reduce the sensitivity of the film, leading to underexposed or poorly exposed images. This can result in images with insufficient detail, low contrast, or poor tonal range.
Image artifacts: X-ray damage can introduce unwanted artifacts in the image, such as streaks, spots, or distortions. These artifacts can significantly affect the image quality and overall appearance.
Permanent damage: Unlike some other forms of damage that can be mitigated or corrected to some extent, X-ray damage to film is often permanent. The radiation exposure alters the structure of the film, making it challenging or impossible to fully restore the original image quality.
How do I fix X-ray damage?
Assess the extent of damage: Evaluate the severity of the X-ray damage by examining the affected images. Determine if the damage is minor and still acceptable for your intended use or if it is significant enough to warrant alternative solutions.
Digital restoration: If the X-ray damage is relatively minor, you can attempt digital restoration techniques to improve the image quality. This may involve adjusting contrast, sharpness, and color balance using image editing software. While it won't fully restore the image to its original quality, it can help minimize the visual impact of the damage.
Crop or reframe: In some cases, cropping or reframing the image can remove or minimize the areas that are most affected by X-ray damage. This can help salvage the remaining usable portions of the image and create a more visually pleasing composition.
Embrace the artistic effect: X-ray damage can create unique and unexpected visual effects. If the damage is significant but still interesting, you might consider embracing it as part of the artistic aesthetic or storytelling of the image. This approach may not be suitable for all images or purposes, but it can offer a creative solution in certain contexts.
Richard wrote an extensive blog post on x-ray damage you will want to read, but here’s the short & sweet version—never put film in luggage going in the cargo hold of a plane. Opt for a hand check of your carry-ons instead of using lead-lined bags, and clearly label packages being shipped internationally.
Start Your Film Order